Tuesday, September 30, 2008

TWD ~ Creme Brulee

Tuesday with Dorie is here again and Mari of the blog Mevrouw Cupcake chose Creme Brulee; found on page 393 in Dorie Greenspan's cookbook: Baking From My home to Yours. I have always wanted to make creme brulee but learned that using a torch to melt sugar is not that easy. In fact, the recipe calls for 1 Tablespoon of sugar sprinkled on top of each creme brulee and this makes a really thick and overly crunchy crust. I figured about a teaspoon and a half was an ample amount of sugar. I can't wait to see other fellow TWD bakers and their brulees to see if anyone else had dark spots on top when taken out of the oven?


The torch was definitely fun to use and I can see using this little torch on meringues in the future. I also can see I need practice. The recipe is simple to make and fast to put together. The biggest part of the recipe is the waiting time for the little creme brulees to chill. Next time, I would like to use only 4 ramekins so there is a deeper spoonful of the custard to scoop from. I didn't deviate from the recipe because I already LOVE vanilla flavor and wanted the original recipe to be my first try.
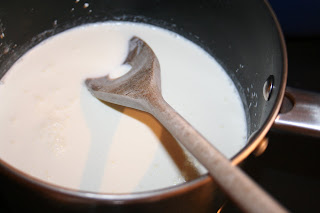


There are just a few ingredients needed to make this custard. Starting out by bringing heavy cream and whole milk to a boil is easy enough.


Whipping the 3 egg yolks, adding sugar (I used by vanilla bean flavored sugar), and the vanilla. Making sure not to add to much air so there are as few bubbles in the mixture as possible.


I used my gravy grease separator for pouring the liquid custard. By using this cup, very little bubbles on the surface poured into the little ramekin dishes.


I have had these little porcelain ramekins for a while now and finally was able to use them. The first ramekin, I poured the custard from a regular measuring cup and there were bubbles on the surface. After using the other cup, no bubbles.


I was worried about the brown spots on top of the custard. I do not remember ever ordering a creme brulee at a restaurant and seeing anything colored like this.


This one has a thinner crust of sugar but the coloring looks a little rough =).


This one had almost the whole tablespoon of sugar on top and I found the thick, caramelized sugar crust to be too much. Less sugar on top for us.

Sunday, September 28, 2008

Pinzgauer Beef For the Freezer

We live around a lot of farms and buying a half or quarter cow to have in the freezer over the winter is such a wonderful feeling. An abundance of hamburger, stew meat, and beef bones for flavorful stocks and soups is at my fingertips. I work with a plumber right now who raises Pinzgauer cows with his neighbor and best friend. Between the two farms in Centralia, WA, they have quite a few acres to raise their herd of cattle. This beef is suppose to be so much better then Black Angus for several reasons. One of which is that the meat is leaner. Less waste to fat when butchered and cooked. The butcher that Paul and Matt, the two cattle farmers/constructions workers, use has been butchering beef for years. In fact, Roger, the butcher, has been butchering beef for Paul and Matt's fathers, when the two were still toddlers. Roger stated that 2 Black Angus steer will fill a 55-gallon drum with waste of fat, etc., when butchering yet ALL 12 head of Pinzgauer beef butchered only filled (2) 55-gallon drums with waste! The meat is lean and tender. Graded at Choice, an excellent quality and marbling. The grades for beef are Prime, Choice, Select, Standard, Commercial, Utility, Cutter, and Canner. Quality grading is voluntary by packer and not all packers choose to grade the meat. Pinzgauer beef have increased wean weights, thrive in all climates, early maturing and disease resistant, with tender lean beef without losing "any" flavor.

The cows were grain fed and went to the Butcher in late August. This is a general time that most beef cattle go to the butcher in the Fall period. The meat was hung for 21 days and then cut into specifications of each person paying for their half or quarter. The butcher, Roger, is a wholesale butcher, not retail. This means he breaks the beef down into specific cuts and only offers "some" specialty cuts. I, of course, have to be a pain in the butt and ask for all the specialty cuts I can get away with, such as Porterhouse steaks, briskets, leftover tender roast after cutting the Porterhouse steak.

An interesting point I learned and want to share is this. My half cow weighed 428 pounds. After butchering and discarding large bones, and waste, the meat I received was around 300 pounds. I paid 3.50 per pound "before" cutting and packing. This is a great price compared to what I pay in the grocery store for my different cuts of beef throughout the year. BUT I had no idea when ordering a half cow ~ a person only receives 3 Porterhouse steaks per cow side. If I order a whole cow, a butcher can only get 6 Porterhouse steaks. The region for this tender and luxurious cut of beef is that small of an area on a cow. I was shocked. Here I am counting all my steaks before I knew the facts. I would like to also add that I printed out a diagram of the cow and all the sections, labeled all the cuts I could receive out of each section and gave an estimation of how much hamburger, stew meat, and soup bones I would get. The whole research and labeling took me about 3 hours. I was told to call the butcher directly. . .and boy did I get a wake-up call. That is when I found out that butchers cutting and packing cows in large numbers for farmers all over the area are wholesale butchers and Roger told me how my cow was going to be cut up, what I could expect for cuts of meat, what did I want for a general weight per roast (4 or 5 pounds each: I choose), did I want soup bones, (I asked for the brisket and Porterhouse: specialty cuts), what grade of hamburger did I want (He listed 2 percentages of fat content), (Oh, I also asked for a rib roast so I was given a choice of how many bones I wanted: 6 or 7) and did I want more steaks then roast? Holy SMOKES! This whole conversation lasted 5 MINUTES TOPS! The man was professional, nice and straight to the point. No holds barred! My little diagram and cuts got to go into a file for "gee, now I know what to look for in the grocery store when I want something to fit a specific recipe". Example, Skirt steaks. . .different then flank steaks. I use this cut quite often. I'm on my own here. Don't get me wrong, I have oodles of all the cuts I did recognize, like rib roasts, cross-cut rib roasts, tri-tip steaks, top-round steaks, tenderloin steaks, cubes steaks, and every roast I could possibly think of. It is just that, well, how many times does a person dissect a whole beef in 5 seconds. . .okay, an exaggeration. Now that I understand Roger AND I now have the beef in my freezer, I feel MUCH better. I didn't try the beef until the third night after receiving it because Larry and I would look at the freezer and go "What do you want to try first? Well, I don't know, what would you like to try first?" Then I would get frustrated and go fix something that we took out of our now organized freezers that became part of the "USE NOW" pile. We ended up BBQ'ing Rib Steaks. Even this was an ordeal for us. You see, I have a huge barrel BBQ'er for charcoal and smoking that is MINE and Larry has a HUGE gas grill with this fancy shmancy searer and there was a discussion on WHO was going to be the BBQ'er of choice for the first go around. Well, since I sneakily ordered this half cow and "then" told Larry after I committed us. . .I got caught up in the moment. . .I couldn't help myself. . .I LOVE a filled freezer because I feel like I am taking care of my family, and I had promised to work all the overtime I was given and that I could handle. . .hence my working 6 days a week, 10 hours a day for the last 2 months, (except for when we took off a week for San Francisco, which the overtime also helped on), I got to grill the first steaks!

I didn't put anything on the steaks except pepper and a little red pepper flakes. Salt goes on later because I feel salt pulls out to much moisture from the meat while cooking. After BBQ'ing to a medium rare, I let the steaks sit for 10 minutes to let the juice absorb back into the meat. The steaks were huge and the flavor was great! I was worried over all the talk about how lean the meat was and if I would loose out on flavor. . .you know, less fat content maybe less flavor? Well, restaurant quality flavor! Very good!

New problem: I organized the freezer, cataloged all the cuts of beef, and now I don't want to use them yet because I am still on my "high" for having a full freezer. I start using the beef, the freezer just won't be as full. I know, silly. . .but do you have any idea of what I went through inside (guilt wise) trying to get this beef? Yeesh! This next weekend, I am getting the "whole" weekend off. All 2 days!
P.S. I haven't defrosted my freezer yet. . .it was after work when I organized my freezer and I was already tired. Please forgive the ice built-up. . .I am a little embaressed! =)

Thursday, September 25, 2008

Chile Glazed Chicken Hoagies with Slaw

I have been cleaning my freezer out because we just purchased half a cow, all nicely wrapped pieces of meat, labeled, and ready for the freezer. I took everything out of my freezer, organized all the contents, took out what was getting to look a little old, cataloged everything on a list to be posted in the kitchen, and put everything back. What a great feeling and I have to say a first for me! I am hoping to get the whole beef story and pictures up this weekend; I also need the reference so there is a starting point to make notes for what I do and don't like this time around. The feeling of having a stocked freezer is very heady. I feel "almost" ready to go out and buy a whole farm. . .except hubby might have a slight heart failure over this idea =D.

Anyhoo, we ended up with a small pile of meat that really needs to get used up. Frozen chicken breasts are included in my pile of need to use "but" I don't want to just cook anything to use all this meat up. (All this meat includes 3 black Angus ribeye steaks; half a bag of Costco frozen, skinless, boneless chicken breasts reserved for when I was going to make all these chicken sandwiches ahead of time for lunches; ready made dinners I forgot about, like split pea soup, homemade pork and beans, and a chili rotini; a half bag of frozen shrimp; and some odd-and-ends pieces of chicken.) I decided I was making Mexican chile glazed chicken breast hoagie sandwiches. I found the recipe in a Bon Appetit magazine for last month and the meal takes about 45 minutes to make. I can handle that.

The sandwich is absolutely delicious. I would hold back on using quite so much chile sauce on the chicken breasts next time "or" use a little less pickled and sliced jalapenos. Yep, I said pickled jalapenos. This is a first for me and I loved them in the coleslaw. There is no pickled flavor that could be tasted. Just great crunch and a little heat. Awesome football Sunday food!

Chicken Hoagies with Chiles, Cheese, and Romaine Slaw


Ingredients~
4 large dried New Mexico chilies, stemmed and seeded
5 Tablespoons olive oil, divided
4 skinless boneless chicken breast halves
3 cups thinly sliced romaine hearts
1 cup thinly sliced sweet onion "or" red onion
1 7-ounce can or jar of pickled sliced jalapenos, drained, 1/4 cup juice reserved
4 6- to 7- inch-long French baguettes or what ever hoagie rolls you prefer
8 ounces feta cheese. . .The cheese totally makes this sandwich too. . .YUM!


Directions~

Place New Mexico chiles in a medium saucepan; add enough water to cover generously and bring to a boil. Reduce heat and simmer until soft, about 15 minutes. Drain; reserve cooking liquid. Place chiles in process; add 1/4 cup reserved cooking liquid and 4 tablespoons oil and puree until smooth. (This takes a little bit of doing). Transfer chile sauce to bowl; season with salt and pepper.

Reserve 6 Tablespoons chile sauce for sandwiches. Brush remaining sauce all over chicken; sprinkle with salt and pepper. Heat remaining 1 tablespoon oil in large nonstick skillet over medium-high heat. Add chicken and cook until cooked through, 6 to 7 minutes per side. Let chicken rest 5 minutes, then slice thinly crosswise.


Mix lettuce, onion, and jalapenos in medium bowl; add 1/4 cup reserved jalapeno juice to slaw and toss. Spread reserved chile sauce over cut sides of bread. Top bottom halves with chicken, then cheese, then some slaw. Cover with top halves of bread and serve with remaining slaw alongside hoagie.


Chicken breasts waiting to be fried up with the chile glaze spread on them. Salt and pepper have also been sprinkled over all.


Up close look before cooking. You can see the pretty chile pepper red coloring.


Tuesday, September 23, 2008

Tuesday with Dorie. . .with Dimply Plum Cake

Michelle, thank you for choosing the Dimply Plum Cake out of Dorie Greenspan's cookbook (Baking from my home to yours) on page 41. Michelle, with our group Tuesday with Dorie, has a blog called Bake-en,
and you have just got to go see her dimply plum cake. She even put a glaze on hers and the cake looks bakery fabulous! Great job Michelle!

The plums available to me at the grocery store were gigantic and not overly ripe. I could only fit 2 1/2 plum halves across the batter. In fact, the cake never cooked all the way in the center. I know if the plums had been a lot smaller and a little more ripe, the cake would have been loved by all. As it is, the only part fully baked was the outside edges and the whole top. Underneath was gooey, even after I added on 15 more minutes. The top started to get to dried out so I just gave up. I would like to try this again but use peaches. The overall flavor from the part that is done was tasty =).


The batter definitely looked silky smooth. I didn't veer from the recipe at all. . .which is unusual for me.


My plums are HUGE and not overly ripe. I loved how the batter looked squished between the fruit.


A closer look at my mammoth plums.

Monday, September 22, 2008

The Best Raspberry Bars

I have this recipe for raspberry bars that a person just can not keep fingers out of. The toasty struesel filled with old fashioned oats, crushed pecans, and brown sugar, to name a few of the ingredients, closely hugs seedless raspberry preserves mixed with ruby red, fresh raspberries. Soooo good!
Easy and fast to bake is another great asset to this recipe.
Frozen raspberries can be substituted for fresh, but you are using fresh raspberry, check for tartness. If the fresh raspberries are too tart, add 1 or 2 teaspoons of lemon juice to the filling. These bars are fabulous eaten the first day but can be stored for up to 3 days in an airtight container or with Saran wrap over the dish. I am telling you from experience ~ the bars do "not" last that long. Comfort food at its best and pretty to boot =).
The Best Raspberry Struesel Bars
Ingredients~
2 1/2 c. unbleached all-purpose flour (I am totally hooked on unbleached flour now)
2/3 c. granulated sugar
1/2 t. salt
16 Tablespoons (2 sticks) plus 2 Tablespoons unsalted butter, cut into 1/2-inch pieces and softened to a cool room temperature ~ you do not want overly mushy butter.
1/4 c. packed light or dark brown sugar
1/2 c. old-fashioned oats
1/2 c. pecans, chopped fine
3/4 c. raspberry preserves (I prefer seedless)
3/4 c. fresh raspberries (Frozen can be used; just make sure they are thawed all the way first)
1 Tablespoon juice from 1 lemon
Directions~
Adjust the oven rack to middle position; heat oven to 375 degrees. Cut an 18-inch length foil and and fit into length of 13 x 9-inch baking dish, pushing into corners and up sides of pan; allow excess to overhang pan edges. Cut 14-inch length of foil and fit into width of baking pan in same manner.
Spray foil-lined pan with nonstick cooking spray.
In a mixer fitted with flat beater, mix flour, granulated sugar, and salt at low speed until combined, about 5 seconds. With machine on low, add 16 tablespoons butter, 1 piece at a time; then continue mixing on low until mixture resembles damp sand, 1 to 1 1/2 minutes longer.
Measure 1 1/4 cups flour mixture into medium bowl and set aside; distribute remaining flour mixture evenly in bottom of prepared baking pan. Using hands or flat-bottomed measuring cup, press mixture into even layer to form bottom crust. Bake until edges begin to brown, 14 to 18 minutes.
While crust is baking, add brown sugar, oats and nuts to reserved flour mixture; toss to combine. Work in remaining 2 Tablespoons butter by rubbing mixture between fingers until butter is fully incorporated. Pinch mixture with fingers to create hazelnut-sized clumps; set streusel aside.
Combine preserves, raspberries, and lemon juice in small bowl; mash with fork until combined but some berry pieces remain.
Spread filling evenly over hot crust; sprinkle streusel topping evenly over filling. Return pan to oven and bake until topping is deep golden brown and fill in bubbling, 22 to 25 minutes. Cool to room temperature on wire rack, 1 to 2 hours; remove from baking pan by lifting foil extensions. Cut into squares and nibble away. . .so good!

Thursday, September 18, 2008

Maybe A "Little" Late? But We have "Apple Turnovers"~!

Barefoot Bloggers is such a fun event and I especially enjoy making the recipes along with everyone else because I seem to be continually amazed at how each of the recipes are adapted around entertaining. I love the idea of inviting friends over and actually having the time to enjoy their company; "Not" run out of the kitchen, see if anyone needs a refill, run back in and finish the next dish, hope everything times out the way I had planned, and get everything out on the table. I have had a few evenings where my guests may have seen glimpses of me. I feel embarrassed because I know they would rather be helping or just relaxing with me included "and" be just as happy eating a ham sandwich. . .heaven forbid! The ham sandwich I mean. Ina's recipes focus on parts of the recipe, if not all, being done ahead of time or where guests can be included in preparation. . .with nothing too hard to accomplish. A glass of wine could actually be held longer then a quick slurp. Nice. Thank you Anne of Anne Strawberry for making this stunning choice. The recipe was user friendly and fun. I did not change a single thing and I loved it! I may add toasted and crushed pecans the next time, but I really enjoyed the turnover just the way it was.

I went to Whole Foods to get apples and the only apples available to me for baking purposes were Honeycrisp. The apple is more on the sweet side without any tart flavor but the apple holds up excellently to baking. No mushiness here. I always use Granny Smith apples so I enjoyed getting out of my little rut. The orange peel and fresh orange juice was another nice touch and I did add more cinnamon and nutmeg then was called for. I love herbs and spices and I think many recipes play down the spices to cover a majority of palettes in hopes that many will adjust according to personal taste.

The Barefoot Contessa Recipe can be found at the Food Network website. I am also printing this one here because I want to have easy access for myself since I am definitely baking this again for the weekend. The recipe is so easy and delicious.

Apple Turnovers
1 teaspoon grated orange zest
3 tablespoons freshly squeezed orange juice
1 1/4 pounds tart apples, such as Empire or Granny Smith (3 apples)
3 tablespoons dried cherries
3 tablespoons sugar, plus extra to sprinkle on top
1 tablespoon all-purpose flour
1/4 teaspoon ground cinnamon
1/8 teaspoon ground nutmeg
Pinch kosher salt
1 package (17.3 ounces, 2 sheets) frozen puff pastry, defrosted
1 egg beaten with 1 tablespoon water, for egg wash

Directions~
Preheat the oven to 400 degrees F.


Combine the orange zest and orange juice in a bowl. Peel, quarter, and core the apples and then cut them in 3/4-inch dice. Immediately toss the apples with the zest and juice to prevent them from turning brown. Add the cherries, sugar, flour, cinnamon, nutmeg, and salt.

Flour a board and lightly roll each sheet of puff pastry to a 12 by 12-inch square. Cut each sheet into 4 smaller squares and keep chilled until ready to use.

Brush the edges of each square with the egg wash and neatly place about 1/3 cup of the apple mixture on half of the square. Fold the pastry diagonally over the apple mixture and seal by pressing the edges with a fork. Transfer to a sheet pan lined with parchment paper. Brush the top with egg wash, sprinkle with sugar, make 2 small slits, and bake for 20 minutes, until browned and puffed. Serve warm or at room temperature.


I love how these little turnovers are golden brown with sparkles of colored sugar crystals on the top.


The dried cherries were another great addition, even though the flavor of the cherries did not really jump out and grab the taste buds.


Dinner Made Easy

I have decided that I am going to concentrate on easy, well-rounded dinners made in under an hour ~ start to finish ~ during the week. I am finding that working long hours and getting caught up in all these elaborate but delicious
sounding (and looking when there are pictures) meal ideas is completely wearing me out and all the time I have left is to put the leftovers in the frig., cleaning my mess and going to bed. No final enjoyment, just exhaustion. From now on, there will be weekend dinners and weeknight dinners, such as those printed in cooking magazines for our inspiration! This will not mean boring week night dinners though. I need the challenge of fun flavors to go with finding the desire to go home and make dinner. If dinner ideas become mundane, I will find 5 different excuses as to why buying a ready-to-bake pizza is the right choice for dinner and I simply refuse. Besides, I love my homemade pizza =).

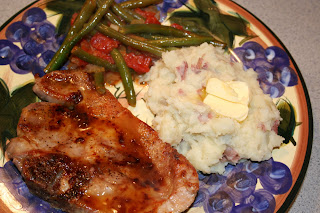
Dinner for the Evening: (drum roll. . .) Serves 4
Glazed Pork Chops
Smashed Potatoes
Stewed Green Beans

Glazed Pork Chops
Ingredients~
4 bone-in pork chops (about 9 ounces each)
1/4 cup packed light-brown sugar
1 Tablespoon Dijon Mustard


Directions~
Heat broiler to high. Line a baking sheet with aluminum foil. In a small bowl, combine sugar and Dijon. Place pork on sheet; season with salt and pepper. Broil until pork begins to brown, 6 to 8 minutes; spread sugar mixture over top. Broil until glaze is browned and pork is opaque through out, 1 to 2 minutes. Serve pork with potatoes and green beans.


Smashed Potatoes

Ingredients~
1 1/2 pounds red new potatoes, scrubbed well and quartered
1 garlic clove, minced
1/2 cup whole milk
2 Tablespoons butter

Directions~
Set a steamer basket in a large pot. Fill with enough water to come just below the basket; bring to a boil. Add potatoes; reduce to a simmer, cover, and cook until tender, 12 to 14 minutes. Transfer potatoes to a bowl; set aside.

Remove steamer basket; discard water from pot. In same pot, melt 1 Tablespoon butter over medium heat. Add garlic; cook until golden brown, 1 to 2 minutes. Add potatoes; mash coarsely. Cook, stirring, 1 minute (a film of starch will form on bottom of pot). Stir in milk and remaining tablespoon of butter; heat until warmed through, about 1 minute more. Season with salt and pepper. Remove from heat; cover. Set aside while getting started on the pork chops.


Stewed Green Beans

Ingredients~
2 Tablespoons butter
1/2 medium red onion, diced
2 celery stalks, halved lengthwise and thinly sliced
coarse salt and ground pepper
3/4 to 1 pound fresh green beans or 1 package (10 ounces) frozen green beans
1 can (14.5 ounces) diced tomatoes in juice

Directions~
In a medium saucepan, melt 2 Tablespoons butter over medium heat. Add onion and celery; season with salt and pepper. Cook, stirring occasionally, until vegetables begin to soften, 5 to 6 minutes. Add green beans and tomatoes (with their juice); cook, stirring occasionally until beans are tender, about 15 minutes.


Tender, yet still slightly crisp.